Friday, September 26, 2014

BlackBerry Curve 8900 Hard Reset Instructions

BlackBerry Curve 8900 Hard Reset Instructions - talking about Blackberry, on this blog we have been discuss about hard reset tutorial for Blackberry Z10. If you want to read about it , visit here. Ok, now about hard reset instructions for the BlackBerry Curve 8900. As we know it, this smartphone work on under GSM network with frequency of 850 / 900 / 1800 / 1900. Its was release on 2008,  November and this phone has discontinued. The phone powered by 512 MHz processor and runs on BlackBerry  operating system with 256 MB of ROM. Ok, how to hard reset this smartphone? Follow this guide below:

BlackBerry Curve 8900 Hard Reset Guide / Instructions :
The first, remove and reinsert the battery
Then, From menu select Menu key > Options > Security Options > Security Wipe > Enter "blackberry" (without quotes), further press the Wipe button on screen.

To delete data from the messages, contacts or other applications, select the Emails, Contacts, Etc check box.
While to delete all third-party applications that you have added, select the User Installed Applications check box.
Then, to delete all files from your media card, select the Media Card check box.

Read More..

Manual Update Galaxy S3 mini i8190 with Official XXAME1 Jellybean 4 1 2 Firmware

 Here’s something for Samsung Galaxy S3 Mini smartphone users as there’s an all new firmware for the device and is dubbed as Jellybean 4.1.2 XXAME1 firmware version which comes with some bug fixes along with some minor tweaks here and there of which we are not having the exact change log. So, for all those who have not got this update can apply this update manually. Before we proceed on to check on what are the list of instructions to apply this update, you will have to follow the list of quick pre requisites mentioned below;


Note: Applying this firmware won’t Root / Void the warranty in any manner. It’s completely safe to apply this update manually.
Quick Pre Requisites:
  • Create a backup of all the data with the help of below mentioned steps and not with the Samsung KIES as your device may not detect with the KIES after applying this update as till now this update might not have arrived for your Country.
SMS – Use “SMS Backup & Restore app”,
Contacts – 
Sync with the Gmail application,
Call Log -
Call Log and Restore
Images, Songs, Videos, Files – Copy to internal / External SD Card,
APN and MMS Settings –
Note down from the path “Applications > Settings > Wireless and Network > Mobile Networks > Access Point Names”
  • Enable the USB Debugging from the path “Settings > Applications > Development > USB debugging” and also you will have to ensure that the minimum battery life should be 30% so as to ensure that the phone doesn’t get turned Off in the middle of update. Disable / uninstall all the security suites installed in your phone.
  • Now, turn Off your device so that it can be entered in the Recovery Mode. Recovery Mode in Galaxy S III Mini can be entered by pressing the Volume Up + Menu Button and then holding these both buttons, you will need to turn ON the device so that it can be entered in the Recovery Mode.
  • In Recovery Mode, clear all the cache and wipe the data by selecting the corresponding options. Once it’s done, reboot the device in the Normal Mode. If you are on custom ROM firmware, then you also need to clear the dalvik cache.
Disclaimer: Follow all the instructions mentioned in this article as if there is any damage caused due to not following instructions then we shall not be held liable or responsible. Just in case if you face any issues then we will try our level best to address the same.
Assuming that you have followed all the above mentioned instructions, you can proceed on to next step where we have mentioned the detailed guide on how to apply with this firmware update. 

Procedure to Update Galaxy S3 Mini i8190 Smartphone with Jellybean 4.1.2 Firmware:
  • Open Odin in your computer. Download Mode in Galaxy S3 Mini I8190 can be entered by first turning Off the device and then hold Volume Down Rocker Key + Menu Button and then Power ON the device. Once the device is booted and you see the Download Mode Green Robot, you can release the button combos.
  • Connect your device to the computer with the help of original USB cable and then you will see that the ID : COM section will turn Yellow / Green, indicating that all the drivers are installed successfully.
  • Click on “PDA” to select the tar file which you got from the firmware package which is the TAR File which you got after extracting the file from the first step.
  • Once all the file is selected, click on “Start” to start the process of firmware update. Once the firmware update process is completed which will be mentioned in the ODIN, the Galaxy S3 Mini I8190 device will be rebooted.
  • For firmware update to be finished, it will take around 2-3 minutes for applying the update. Once the device is updated successfully, the device will be rebooted. As soon as you see the Language preferences or the Home Screen, you need to disconnect the device from computer and enjoy using your phone.
Note: If the device gets into the boot loop sequence or say gets stuck in the welcome Lcd, just re insert the battery and re follow the above instructions so as to again follow the above mentioned instructions.
So there you go, you have now successfully updated your phone with the latest firmware of Jellybean 4.1.2 in your Galaxy S3 Mini I8190 smartphone. Do let us know in the comments section just in case if you face any issues.
Read More..

Thursday, September 25, 2014

Mobile Flash Problem Solution

Mobile Flash Problem Solution : To solve major problem of a mobile its necessary to flash for perfect solution. Flash provides a new software for mobile memory. In this way a mobile can perform better again by the flash of EEPROM. But We should know which is the best  flashing box for China mobile phones. Also best Flash box for Nokia, Samsung, Sony etc. Good flash box can perform best, which provides trusted secured and reliable solutions. Make sure that the mobile phone hardware is ok, otherwise it may damage for some hardware problem during flash. Very old mobile set may occur to the dead position. So we must follow it. There are many kind of procedure now  for Chinese handsets. 5 years ago only one box was available named Spider man box, which is now outdated. So now it is always better to have a box which flashes all brands and models and also solves the faults. Suggested good flash box like below, you can use it...


Download the file to get more help...
Read More..

How to return back to Stock ROM

Android: A Complete Guide


Part: 5

How to return back to Stock ROM: After you have played with Custom ROMs


In the Android world it is often said that "If you have not played with it, you have not used it". Most people who are familiar with the Android development play with Custom ROMs (Operating Systems). These are made by developers who know their way around the Android File system and programming language. The purpose is to get more out of each and every device.

Many android users use these custom roms to personalize their device to their liking. However, sometimes it so happens that you need to take the device back to the original state, the state it was in when you took it out of the box. The reasons for doing so may vary from:

  1. Sending it for warranty repair
  2. Starting afresh
  3. Sorting out some bugs etc.
In this part I will guide you through the steps required for doing so.

Step 1: Download the Original Firmware (Complete OS, includes Boot image, Recovery image, sboot, partition information etc.).

The Original Firmware for your region may be downloaded from various sources:
In either of the above sources you will have to specify your OS name, Device Name, OS version and Region. After that you will be presented with a list of the latest firmwares. Download the firmware.

Step2: Reset the Binary Counter

If you have been into Custom Roms and have rooted your phone, most likely your binary counter is not 0.

You can check your binary counter by booting into Download Mode.
It can be done by pressing and holding Volume Down + Power + Home buttons together. You will get to Lcd which will ask you if you want to enter into download mode. Now press volume up button.

Here you will get all the information about your device status:

Odin ModeProduct Name: GT-I9300
Custom Binary Download: a number
Current Binary: Samsung Official/Custom
System Status: Official/Custom

Our purpose is to change the "Custom Binary Download" to 0.

For this we will require a special application know as "Triangle Away" made by XDA Elite Recognized Developer Chainfire. You can buy this app from the Playstore or download it free from XDA Developers website.

Once installed, fire up the app and follow the instructions given there. Dont worry it should not damage your device.

After it has done the trick, check the download mode again to see whether the binary counter has changed to zero or not.


Step 3: Flash the Official Firmware

Now you will need to flash the official firmware you had downloaded in the first step.

Open, Odin application on your pc and connect your phone (For detailed instructions check out this blog post)

After you have flashed the firmware, you have now reverted your phone back to the status it was in when you had bought it.

Please feel free to post your comments and questions.

Enjoy the Android Goodness!!


Read More..

How to Root Samsung Galaxy Mega 6 3 I9200 with Android 4 4 2 XXUDNE4 KitKat Official Firmware Using Odin Guide


Announced in April 2013, Samsung Galaxy Mega 6.3 is now available for purchase in several countries in the world. The Samsung Galaxy Mega 6.3 - as in a 6.3" Lcd, comes with 3G (GT-I9200) and LTE (GT-I9205) version that runs on Android 4.2.2 Jelly Bean.
Followed by the market rollout, XDA-Developers member VCore has released root method for both I9200 and I9205 version of Galaxy Mega 6.3.
Samsung Galaxy Mega 6.3 users who wish to root their devices, may follow our step-by-step guide.
Disclaimer: Rooting voids the warranty of your device. We and the developer of this rooting procedures shall not be held responsible if any undesirable outcomes may happen to your device. use of this root guide is solely at your own risk!
Pre-requisites
1. Install USB Driver for Samsung Galaxy Mega 6.3 on the computer.
2. Enable USB Debugging Mode on the phone by navigating to Settings >> Developer Options.
3. Make a backup of all your important data before following the guide.
4. The Galaxy Mega 6.3 should be factory unlocked and not locked to any particular carrier.
5. Ensure the battery of the phone is charged more than 80 per cent.
6. The Root Package file works only on Samsung Galaxy Mega 6.3. Applying these to any incorrect variant might brick the device. Verify the model number of the Galaxy Mega 6.3 by navigating to Settings >> About Phone.
Files Required
1. Root Package for Galaxy Mega 6.3 (vcoreroot-v2.tar)
2. Odin 3.07 (Mirror Link)
Steps to Root Galaxy Mega 6.3 Running on Android 4.2.2 Jelly Bean Firmware
Step 1: Extract Odin 3.07 file using WinRAR/7-Zip/WinZip or any other extracting tool.
Step 2: Switch off the Galaxy Mega 6.3. Then boot the device into Download Mode by pressing and holding Volume Down, Home and Power buttons together until a construction Android robot icon with a warning triangle appears on Lcd. Now press the Volume Up button to enter Download Mode.
Step 3: Launch Odin on the computer as an Administrator.
Step 4: Connect the Galaxy Mega 6.3 to the computer using USB cable while it is in the Download Mode. Wait until Odin detects the device. When the device is connected successfully, the ID: COM box will turn blue with the COM port number. Additionally, the successful connected will be indicated by a message saying Added.
Note: If the Added message does not appear, then try re-install USB drivers or changing the port on the computer.
Step 5: In Odin, click the PDA button and select the vcoreroot-v2.tar file.
Step 6: Verify that Auto Reboot and F.Reset Time checkboxes are selected in Odin. Also, ensure the Re-Partition option in Odin is not selected.
Step 7: Double-check and click Start in Odin. The installation process will now begin.
Step 8: Once the installation process is completed, your phone will restart and soon you will see a PASS message with green background in the left-most box at the very top of the Odin. You can now unplug the USB cable to disconnect your device from computer.
Samsung Galaxy Mega 6.3 running on Android 4.2.2 Jelly Bean firmware is now rooted successfully. You can now install any app that requires root permission. Verify the root status of the device by downloading Root Checker app from Google Play Store.
Thanks to all fellas at XDA who first tried out this rooting technique. This method was originally posted via XDA-Developers original thread.
Read More..

Wednesday, September 24, 2014

NOKIA 1661 SIM IC JUMPER


NOKIA 1661 SIM IC JUMPER
Read More..

samsung E1080 Sim solution tested 100

samsung E1080 SIM SOLUTION

Read More..

Samsung C5212 Keypad solution 100 solution


Read More..

Nokia 108 RM 944 And RM 945 Flash File Free Download

Download RM-944 And RM-945 Flashing Firmware Version 11.01 for Nokia Mobile 108
Nokia
Nokia Mobile 108 Dual Sim and Single Sim MTK CPU Bassed Handset RM-944 and RM-945 Update Flash File
Or,
Read More..

Tuesday, September 23, 2014

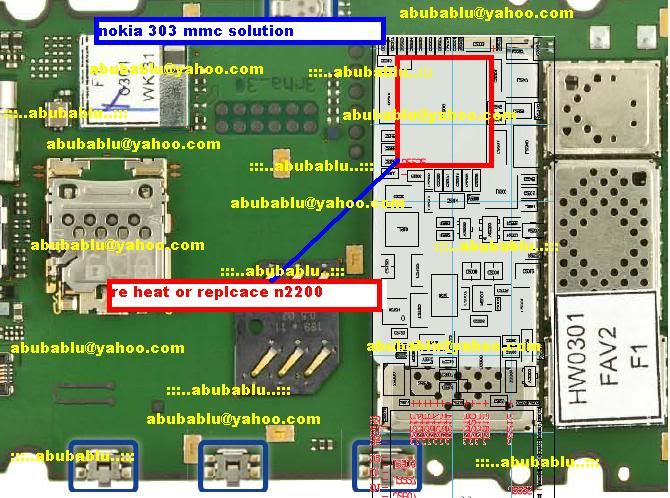
Nokia 303 mmc solution

mmc


Read More..

iTunes v11 1 Custom IPSW Restore Error 11 Fix Dont Update to iTunes v11 1 4 62

iTunes v11.1 Custom IPSW Restore Error-11 Fix - Dont Update to iTunes v11.1.4.62


***UPDATE***
1/30/2014
This *FIX* currently no longer works with iTunes v11.1.4.62 or higher. crApple has changed something in iTunes that causes it to crash when using this *FIX*. Only solution right now is to NOT UPDATE to iTunes 11.1.4.62 or to DOWNGRADE to v11.1.3.8 and then apply the *FIX* at the bottom of this post.
A few days ago I was trying to restore an iPhone 4 using a Custom IPSW and I was presented with a nice iTunes Error 11 like the one posted above. I had a feeling that this was something to do with iTunes v11.1. So I downgraded back to iTunes v11.0.5.5 and all was well. However since a couple weeks have passed since Id installed iTunes v11.1 I didnt want to completely redo my library nor did I want to waste time reverting to a previous iTunes Library file since it wouldnt be current anyways.

After doing some research I found this on the iH8sn0w blog...
I know most people like myself have already updated to iTunes 11.1.x.x and would rather not be burdened with having to downgrade and have to redo their entire library. Well never fear, I is here

Ive created a "FIX" for the issue which will replace the problematic files with files from iTunes v11.0.5.5 and will allow you to restore Custom IPSWs to your device using iTunes 11.1.x.x without getting Error 11 messages.

This fix was tested on iTunes v11.1.1.11 but will more than likely work with any newer versions of iTunes until of course Crapple changes something else. If you install this fix and it doesnt work for you then you can simply uninstall the fix and it will revert iTunes back to its original state. So there is no harm in testing it with newer versions of iTunes.

This fix only needs to be applied to iTunes version greater than v11.1.0.0. The last good version of iTunes that doesnt have the "Error-11" issue is v11.0.5.5. You can either downgrade to iTunes v11.0.5.5 or simply apply this fix to your iTunes v11.1.x.x or higher to resolve the issue.

This fix works with both 32-bit and 64-bit versions of iTunes.

Simply download and extract the ZIP file in the link below and run the included EXE file. Its very straight forward and more info is included once you launch the FIX.

iTunes_v11.1_Error-11_Fix_v1.4.zip
Version: 1.4
MD5: e0eabab331ef7799fbfdde6e1a2cfa18
Changelog
v1.4
- Change OS Architecture Detection Method
v1.3
- Added a check for Administrator Priviliges
v1.2
- Fix for iTunesHelper.exe not restarting on 64-bit OSs
v1.1
- Fix for iTunesHelper.exe not restarting on 32-bit OSs
v1.0
- Initial Release

Any questions or comments feel free to post up! 
Read More..

How To Install CWM ClockWorkMod Us Recovery on HTC Android Phones


By default, Android powered HTC Smartphones comes with Locked Bootloader and default Recovery firmware which is not so much useful and handy. ClockWorkMod recovery is a very simple and feature rich recovery software which gives many features like Backup and Restore, Mount as USB etc which are mostly not available on stock Firmware or recovery software.

           To install CWM Recovery, you first have to Unlock your devices bootlaoder and then Root your phone. After going through these two processes you will be able to install ClockWorkMod recovery on your HTC mobile phone. Although, now doing these two things may seem very difficult, but actually these are very simple to do and at the end youll have a freedom in your device, freedom to do anything or install any custom ROM on your device. Please note that Unlocking botloader and Rooting your phone will void your warranty, so do it at your own risk. Here, i am using HTC Desire C, so the actual process or steps may vary phone to phone.
How to Install ClockWorkMod Recovery on Your HTC Smartphone:
  • First of all, as mentioned above you have to unlock the Boot loader of your device. To do this, follow this guide:
    How to Unlock Bootloader of HTC Mobile Phone.
  • Now, next item comes Rooting process. For this, follow this guide:
    How to Root Your HTC Android Phone.
  • Go to this link to download the ClockWorkMod Touch For HTC Desire C:
    http://forum.xda-developers.com/attachment.php?attachmentid=1257426&d=1344803585
    For other phones search on Google: ClockWorkMod For Your Device Name and download the file given there.
  • Extract the downloaded archive to C:Android folder.
  • Now Boot your phone to bootloader. For this:
    Remove the battery.
    Put the battery and press Vol Down+ Power button.
    Select Fastboot, now it will say USB Fastboot
  • Open Command prompt by going to start menu and typing cmd.
  • In command prompt window, type the following :
    cd C:Android
  • Now type the following and hit Enter:
    fastboot flash recovery recovery.img
  • Thats all. Restart your phone and youve successfully installed CWM Recovery on your HTC Android phone
Read More..

iPhone 4 Camera solution and measure points

this solution is tested 100%

Front camera not working (water damage)


Read More..

Monday, September 22, 2014

Nokia 1280 insert sim Problem New Jumper Solution

Nokia 1280 insert sim solution.
Nokia
Read More..

Nokia C7all Solution

Nokia C7 Solution - Power ON-OFF Switch Jumper

Ways

Nokia C7 Not Charging Problem via Wall Charger Solution


Nokia C7 Insert SIM Card Problem Solution - Flex Jumper Tracks


Nokia C7 Touch Screen Not Working Problem Solution


Nokia C7 Sim card flex board jumper ways, insert sim card solution


Nokia C7 Earpiece Speaker Problem Solution

Read More..

Apple Devices Firmware

    Iphone 4s

5.0.1 (4S ): iPhone4,1_5.0.1_9A406_Restore.ipsw 
5.0.1 (4s): iPhone4,1_5.0.1_9A405_Restore.ipsw
5.0 (4S): iPhone4,1_5.0_9A334_Restore.ipsw


             Iphone 4 GSM & CDMA
 
5.0.1 (4 GSM): iPhone3,1_5.0.1_9A405_Restore.ipsw
5.0 (4 GSM): iPhone3,1_5.0_9A334_Restore.ipsw
4.3.5 (4GSM): iPhone3,1_4.3.5_8L1_Restore.ipsw 

4.3.2 (4 GSM): iPhone3,1_4.3.2_8H7_Restore.ipsw
4.3.1 (4 GSM): iPhone3,1_4.3.1_8G4_Restore.ipsw
4.3.0 (4 GSM): iPhone3,1_4.3_8F190_Restore.ipsw
4.2.1 (4): iPhone3,1_4.2.1_8C148_Restore.ipsw
5.0.1 (4 CDMA): iPhone3,3_5.0.1_9A405_Restore.ipsw
5.0 (4 CDMA): iPhone3,3_5.0_9A334_Restore.ipsw
4.2.10 (4 CDMA): iPhone3,3_4.2.10_8E600_Restore.ipsw


                 Iphone 3GS


5.0 (3GS): iPhone2,1_5.0_9A334_Restore.ipsw
4.3.5 (3GS): iPhone2,1_4.3.5_8L1_Restore.ipsw
4.3.4 (3GS): iPhone2,1_4.3.4_8K2_Restore.ipsw
4.3.3 (3GS): iPhone2,1_4.3.3_8J2_Restore.ipsw
4.3.2 (3GS): iPhone2,1_4.3.2_8H7_Restore.ipsw
4.3.1 (3GS): iPhone2,1_4.3.1_8G4_Restore.ipsw
 4.3.0 (3GS): iPhone2,1_4.3_8F190_Restore.ipsw
4.2.1 (3GS): iPhone2,1_4.2.1_8C148a_Restore.ipsw
4.1.0 (3GS): iPhone2,1_4.1_8B117_Restore.ipsw


                   Iphone 3G

4.2.1 (3G): iPhone1,2_4.2.1_8C148_Restore.ipsw
4.1.0 (3G): iPhone1,2_4.1_8B117_Restore.ipsw


             Iphone 2G 
 
3.1.3 (2G): iPhone1,1_3.1.3_7E18_Restore.ipsw
3.1.2 (2G): iPhone1,1_3.1.2_7D11_Restore.ipsw


                       IPAD 2 ( GSM , CDMA Wi-Fi )

5.0.1 (iPad 2 GSM): iPad2,2_5.0.1_9A405_Restore.ipsw 
5.0 (iPad 2 GSM): iPad2,2_5.0_9A334_Restore.ipsw
4.3.5 (iPad 2 GSM): iPad2,2_4.3.5_8L1_Restore.ipsw
4.3.4 (iPad 2 GSM): iPad2,2_4.3.4_8K2_Restore.ipsw

5.0.1 (ipad 2 CDMA ): iPad2,3_5.0.1_9A405_Restore.ipsw 
5.0 (iPad 2 CDMA): iPad2,3_5.0_9A334_Restore.ipsw
4.3.5 (iPad 2 CDMA): iPad2,3_4.3.5_8L1_Restore.ipsw
4.3.4 (iPad 2 CDMA): iPad2,3_4.3.4_8K2_Restore.ipsw
5.0.1 (iPad 2 WI-Fi): iPad2,1_5.0.1_9A405_Restore.ipsw
5.0 (iPad 2 Wi-Fi): Pad2,1_5.0_9A334_Restore.ipsw
4.3.5 (iPad 2 Wi-Fi): iPad2,1_4.3.5_8L1_Restore.ipsw

               IPAD 1 
5.0.1 ( iPad 1): iPad1,1_5.0.1_9A405_Restore.ipsw
5.0 (iPad 1): iPad1,1_5.0_9A334_Restore.ipsw
4.3.5 (iPad 1): iPad1,1_4.3.5_8L1_Restore.ipsw 

                     IPOD TOUCH 4G

5.0.1 (4G): iPod4,1_5.0.1_9A405_Restore.ipsw
5.0 (4G): iPod4,1_5.0_9A334_Restore.ipsw
4.3.5 (4G): iPod4,1_4.3.5_8L1_Restore.ipsw 
4.3.4 (4G): iPod4,1_4.3.4_8K2_Restore.ipsw 
4.3.3 (4G): iPod4,1_4.3.3_8J2_Restore.ipsw 


                IPOD TOUCH 3G

5.0.1 (3G): iPod3,1_5.0.1_9A405_Restore.ipsw
5.0 (3G): iPod3,1_5.0_9A334_Restore.ipsw
4.3.5 (3G): iPod3,1_4.3.5_8L1_Restore.ipsw 
4.3.4 (3G): iPod3,1_4.3.4_8K2_Restore.ipsw 
4.3.3 (3G): iPod3,1_4.3.3_8J2_Restore.ipsw 
4.3.2 (3G): iPod3,1_4.3.2_8H7_Restore.ipsw 
4.3.1 (3G): iPod3,1_4.3.1_8G4_Restore.ipsw
4.3.0 (3G): iPod3,1_4.3_8F190_Restore.ipsw
4.2.1 (3G): iPod3,1_4.2.1_8C148_Restore.ipsw
4.1.0 (3G): iPod3,1_4.1_8B117_Restore.ipsw
4.0.2 (3G): iPod3,1_4.0.2_8A400_Restore.ipsw
4.0.0 (3G): iPod3,1_4.0_8A293_Restore.ipsw
3.1.3 (3G): iPod3,1_3.1.3_7E18_Restore.ipsw


             IPOD TOUCH 2G 

4.2.1 (2G): iPod2,1_4.2.1_8C148_Restore.ipsw 
4.1.0 (2G): iPod2,1_4.1_8B117_Restore.ipsw
4.0.2 (2G): iPod2,1_4.0.2_8A400_Restore.ipsw
4.0.0 (2G): iPod2,1_4.0_8A293_Restore.ipsw


               APPLE TV
1.0.0: OS-dot-DMG 1.0.dmg
1.1.0: 2Z694-5248-45.dmg
2.0.0: 2Z694-5274-109.dmg
2.0.1: 2Z694-5387-25.dmg
2.0.2: 2Z694-5428-3.dmg
2.1.0: 2Z694-5485-1.dmg
2.2.0: 2Z694-5499.dmg
2:3:0: 2Z694-5573-24.dmg
2.3.1: 2Z694-5587-18.dmg
2.4.0: 2Z694-5660-029.dmg
3.0.0: 2Z694-5789-067.dmg
3.0.1: 2Z694-6004-003.dmg
3.0.2: 2Z694-6013-013.dmg
4.1.0: AppleTV2,1_4.1_8M89_Restore.ipsw
4.2.0: AppleTV2,1_4.2_8C150_Restore.ipsw
4.2.1: AppleTV2,1_4.2.1_8C154_Restore.ipsw
4.3.0: AppleTV2,1_4.3_8F191m_Restore.ipsw
4.3.0 (Build 8F202): AppleTV2,1_4.3_8F202_Restore.ipsw
4.3.0 (Build 8F305): AppleTV2,1_4.3_8F305_Restore.ipsw
4.3.0 (Build 8F455): AppleTV2,1_4.3_8F455_Restore.ipsw

4.4.0: AppleTV2,1_4.4_9A334v_Restore.ipsw
4.4.1: AppleTV2,1_4.4.1_9A335a_Restore.ipsw
Read More..

Nokia Asha 300 charging not supported solution working 100

Read More..

Sunday, September 21, 2014

blackberry 8520 error 523 done factory reset using BBsak rodbautis

See this video 

Read More..

Nokia c1 00 lcd light jumper


Nokia c1 00 lcd light jumper 

Read More..

SonyEricsson Xperia X1 Display Rotate problem Solution

xperia
Read More..

Nokia 1616 torch light Problem with Jumper Solution

Nokia 1616 torch light solution.
Nokia
Read More..

Saturday, September 20, 2014

How to Root Oppo Find 7a Android Phone

 Oppo Find 7a Android smartphone can now be rooted so that you can then install the Google Apps and Services in the same to make the most of it. While Oppo of late started coming out with some awesome smartphones, here comes a work around which will help you install G Apps in your device, but for this you will have to root the device. After rooting, you can also install the custom ROM firmwares which are based on the Kitkat 4.4.2 firmwares. After checking out the list of quick pre requisites mentioned below, you need to proceed to the next step where we have summed up the procedure which will help you install the same.

Quick Pre Requisites:
  • Create a backup of all the Data in your Oppo Find 7a Android Phone manually with the help of below mentioned manual steps. Apart from the below mentioned steps, make sure that you are also creating a backup of all the Chat Messengers data as it will also be wiped off after rooting the device.
SMS – Use “SMS Backup & Restore app”,
Contacts – Sync with the Gmail application,
Call Log -Call Log and Restore
Images, Songs, Videos, Files – Copy to internal / External SD Card,
APN and MMS Settings – Note down from the path “Applications > Settings > Wireless and Network > Mobile Networks > Access Point Names”
  • In your Oppo Find 7a, enable the USB Debugging Mode from “Menu > Settings > Applications > Development option”. Minimum battery left in your Oppo Find 7a Android Phone should be > 50% or else the device might just get turn Off in the middle of rooting.
  • Rooting will also help you install many apps which need root access and also you can then install many custom ROM firmwares which will be checking out in the coming days to come.
Disclaimer: We should not be held responsible / liable in any manner for the damage happened to your Oppo Find 7a Android Phone due to not following instructions.
Let’s find out on how you can root and install the custom recovery image in your Oppo Find 7a Android Phone.

Procedure to Root Oppo Find 7a:
  • First up, download the Oppo Find 7a recovery file from here to your computer along with the Root and Google Services Zip package.
  • Extract the recovery zip file to open the recovery executable file in your computer.
 
  • Up next you will see the detailed list of some Chinese instructions. Turn off your device so that it can be entered in the Fastboot mode.
  • Fastboot mode in Oppo Find 7a can be entered by pressing the power + volume up button together. Fastboot should appear on the display.
  • Connect your device to the computer with the help of original USB cable and Hit on enter to start the process of rooting.
  • After this, you need to disconnect your Oppo Find 7a and go in to recovery by pressing the power button + volume down.
  • Select the “English” language as mentioned below;
  • After this, you need to head over to the path English > Install from SD > Wmjan_Root_4.3.zip and install. This will add Super users and Root RE apps to the Find 7a.
  •  
  •  
  • You now need to Install Wmjan_Gms_4.3.zip to install Google services. So there you go, you have now successfully rooted the device. To check on whether your device is rooted or not, you need to check the same with the help of “Root Checker” app.
Note: If at all your Oppo Find 7a smartphone gets in the boot loop mode, then you need to turn off the device and then reapply the update from the start. To turn off, long press the power button and repeat the whole process again.
Do let us know in the comments section just in case if you face any issues in the process of rooting. In coming days to come, we will very soon be coming out with the detailed guides which will help you install the custom ROM firmwares.
Read More..

Nokia C2 01 Insert Memory Card fix problem

Nokia Mobile C2-01 mmc solution.
Read More..

nokia 6760s slide mobile phone repair solution


https://blogger.googleusercontent.com/img/b/R29vZ2xl/AVvXsEio4wEPD9_OOvmIW-EcDqA8Uy_xUs1i7GEa3QpOZYl1pcDhJ0RnJPLrwMHju45tfFvFoIUAVM_Vo-t9_XMJAKYSG-EPABOpNuNkFDrdyxSoVWZRfhgKDzRCGi-GN4J-MAFbVoMBdeAlDCiq/s320/NOKIA6760S.jpg

The following mobile phone repair manuals only covers for Nokia 6760s hardware problem issues.
Insert Sim Card Problem solution
Key Pad Failure Repair Solution
Key Pad Line Paths
LED Back Light Problem
Local Mode / Test Mode solution
Mic (mouthpiece) Solution 1
LCD Display Problem Solution
Not Charging Repair Solution
Charger Not supported Solution
Ringer / Buzzer failure solution
Earpiece Speaker Failure solution
Nokia 6760s solution
Read More..

Nokia n73 insert memory card solution 100 tested

Nokia Mobile n73 no memory card solution,Nokia Mobile n73 inserted memory,Nokia Mobile n73 memory card not formeted ,Nokia Mobile n73 mmc not detected solution,Nokia Mobile n73 mmc insert solution,Nokia Mobile n73 no memory card solution ways jumper 100% tested ,Nokia Mobile n73 memory ic ways solution,Nokia Mobile n73 memory problem ways jumper guide solution,Nokia Mobile n73 memory card not supported just working step by step ous procedure .tnxx to visit my blog plzz share its you tested.
Read More..

Friday, September 19, 2014

How to Save Battery Life on Motorola Moto G

Your phone is like a small computer, giving you tons of information and apps, at lightning fast speed. Depending on what you use, that can take a lot of power.

To see what’s using up battery power, touch Apps > Settings  > Battery.

Note: Do not enable Battery Saver, as it can affect your service when not on Wi-Fi. To check that Battery Saver is off, touch Apps > Settings > Battery  > Battery Saver.

To set automatic rules to save power, touch Apps > Assist (see “Motorola Assist”).

Follow these suggestions to save your battery life:

  • Turn off your Bluetooth when dont need it: Touch Apps > Settings, then touch the switch next to Bluetooth to turn it OFF.
  • Turn off GPS tracking: Touch Apps > Settings  > Location  > Mode > Battery saving to turn off GPS tracking.
  • Lessen your display brightness: Touch Apps > Settings > Display > Brightness > (slide dimmer setting left).
  • Shorten display timeout delay: Touch Apps > Settings > Display > Sleep > (shorter setting).
  • Reduced widgets that stream information to your home Lcd, like news or weather.
  • Removed unused online accounts that you registered: Touch Apps > Settings. Go to the ACCOUNTS section, and touch the one you want to remove. Touch it again, then touch Menu > Remove account.
  • Minimize recording or watching videos, listening to music, or taking pictures.
Read More..

Nokia E65 camera Problem with Jumper Solution

Nokia E65 camera solution by ashad..
Nokia
Read More..

How to Save Battery Life on Sony Xperia Z1s

Battery Life depends on how you use your device. For your Sony Xperia Z1s device, if you want to save your battery to last longer hours, you may need to adjust your settings.

Follow these suggestions:

• Turn on the power-saving option on the device. Then lessen the Lcd brightness and the Lcd lock timeout. On the HomeLcd, tap on . Select Settings > Power management.
     - Use the Stamina mode and Low battery mode features.
     - To activate the STAMINA mode: While you are in the Power management, tap on Point icon next to STAMINA mode, then tap Activate.
• Turn down your device volume with the volume keys.
• Close any apps or features when you are done using it so they will not continuously running in the background.
• Turn off the network connection if you are out of range so that your device will stop searching for a network signal. To turn off the network go to Settings and turn off the Bluetooth and Wi-Fi.
• You should use the latest version of the software update. Software updates improves some features and fixes some bugs on the previous software version.
• Adjust your brightness level to low.
• Turn off the camera flash.
• If you have any live wallpaper, Disable it.
• Set the synchronization application to manual. You can also choose the automatic, but increase the synchronization intervals.
• If you want to listen to music, use the Sony original hands free device. It demand less battery power than your devices own loudspeakers.
Read More..

UnDelete Files Windows 7 Recovery About Computer Tutorial

Undelete
Undelete Files in Windows
There are so many times when you accidentally delete your important data. Sometimes, some operating system error or hardware failure causes the loss while most of the time, our own mistakes lead to removal or loss of very precious information. If you also accidentally deleted your data and now eager to get it back then you are in luck. Here, you will find a working trick or method to Un Delete your files in Windows 7. In this method, we actually use a data recovery software or tool to recover lost files of Folders in Windows 7. By the way, this method works on all Windows i.e. Windows XP, Windows 8 and Vista also. You can recover any type of data, whether it is a picture or photo, a video file, music file or presentation or worksheet. This tool recovers any kind of data.
You may also like: Enable Aero in Windows Home Basic and Starter Edition
How To UnDelete Files in Windows
In this tutorial, we will be using a software or tool known as UnDelete Plus. This tool is 100% free, so you dont have to worry about the price. Follow the steps to download and install the software.
  • Go to Software Download Page.
  • Your download will start automatically.
  • Now Run the file and install the software.
  • Now run a Search for lost files.
  • Customize your search according to your requirements.
  • Restore the desired files or data
Read More..

Thursday, September 18, 2014

China Android Winmax W400 Official Firmware Flash File Free Download

Winmax W400 Official Firmware Flash File Free Download
Winmax-W400
OS 4.2.2 Jelly Bean
Display Size 4" TFT Capacitive Full Touch
Camera 3.2MP Primary + 1.3 MP Secondary
Multimedia MP3, MP4, FM
Data Services 3G, EDGE
Phonebook Entries Unlimited
Multitouch Yes(2 Fingers)
Technical Features Description
Display Resolution WVGA (480*800)
CPU 1.3 GHz (Dual Core)
GPU Mali 400
Internal Memory RAM 512 MB
Storage ROM Total 4 GB
Extended up to 32GB,
Battery 1800 mAh
WLAN Wi-Fi 802.11, Wi-Fi Hotspot
GPS No
Stand by time* 300 Hour(*depend on phone setting, Network)
Talk time 3 Hour(*depend on phone setting, Network)
Audio Player .3gp, .mp4, .m4a, mp3, .ogg, .wav, .mid, .aac
Audio Recorder AMR
Video Player 3GPP, MPEG4,MPEG-TS
Video Recorder 3gp
3.5 mm jack Yes
Other Features Description
Dimension 126.8*65*10mm
Recorder Audio, video & call recorder
Bluetooth Yes
USB Mass storage Yes
USB Modem Yes
MMS Yes
Email Yes
Built in Applications Facebook, YouTube, Android Market(Play Store), Gmail, Office suite,
Special Features G sensor, accelerometer sensor
Read More..

Samsung E251 Network Solution

Samsung E251 Network Solution,Samsung E251 Network Failed Solution ,Samsung E251 Network Weak Solution,Samsung E251 Network Problem Ways Solution,Samsung E251 Network Ways Jumper Solution,Samsung E251 Network Repair Solution

Read More..

Wednesday, September 17, 2014

Nokia C1 01 Mic Problem with Jumper Solution

Nokia C1-01 Mic solution.
Nokia
Read More..

N8 Front Camera Connector Ways how to fix problem

Solution in this article is for Nokia N8 Front Camera Problem
Solution. Please note that this solution is for the Front camera that
is placed in front of the phone right above the LCD and is used for
video calling and not the primary camera which is used for taking
pictures. If you need the solution for Primary Camera problem read
this post Nokia N8 Camera Problem Solution.

I have marked all the Nokia N8 front camera connector legs ways
jumpers points the diagram below, the black legs are Ground. Only make
these jumpers if you have damaged front camera prints if all the
prints are okay and front camera is still not working replace the
camera module itself. If you need help with dissembling your phone
check this article Nokia N8 How To Dissemble Guide with Diagrams.

Please Note that we will edit these solutions or add new ones if found
in this page at any time in the future. So feel free to come back any
time on this page to stay up to date.

If you have further Questions please don't hesitate to leave a comment.

Note: Every repairing solution posted here is tested by at least one
member of our team. Use the information available here at Your Own
Risk. We are not responsible if any harm comes to your device during
the repairing process.
Read More..